If you are shooting on a deadline it makes sense to shoot in jpeg mode for faster downloading and then uploading out to your media service. However, if you are a beginner, I highly recommend shooting ice hockey in raw mode. Raw gives you a greater ability to adjust your white balance and bring out shadow detail in case you didn’t get it just right in camera.
I thought it would be fun and educational to take an image and examine it both before and after post-processing. They say a picture is worth a thousand words, so let’s use some pictures. It will cut down on how much you have to read and how much I have to type!
I do my all of my post-processing using Adobe Photoshop Lightroom 5. If you don’t have Lightroom that’s OK. Most of these tips are generic and can be used in just about any image manipulation program. However, when photographing ice hockey you can easily take a thousand pictures in a single game. Having a program like Lightroom makes it simple to sift through them and identify which images are keepers and which are not.

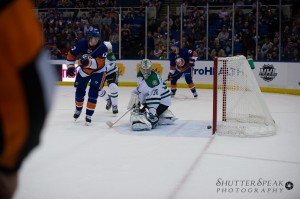
One of the first things you probably noticed about this picture is the ref’s arm ruining the entire left side of my image. Ref’s can be so inconsiderate of media photographers. Always worried about the game instead of us! Cropping for this image will be critical.
A quick check of the image in Lightroom reveals that the image is in focus. Despite the ref’s best efforts, the camera focused on the action. Since I shoot in this particular arena regularly, I know the proper white balance off hand. I had set a custom white balance in camera before the game. If your white balance is off, now is the time to adjust it. Use the eyedropper tool in the Lightroom Develop Module and select a section of the ice to use for white balance.
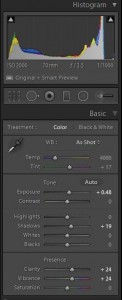
I also felt that this particular image had come out a touch too dark. I brought up the shadows +19 and then upped the exposure +0.48. I added in clarity and vibrance to taste. Clarity boosts your mid range contrast and helps images look sharper. I recommend you always use it. In this case, I set both clarity and vibrance to +24.
Next add in noise reduction and sharpening as needed. In this image I used +40 for noise reduction and +41 for sharpening.

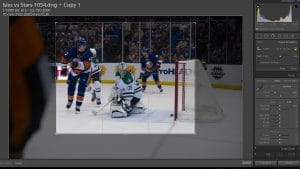
Now it is time to crop the image. I am cropping in the 8×10 aspect ratio because this is what is commonly used by many publications. Needless to say the ref’s arm has to go and is the first part to be cropped. Next, I’ll take the bottom left corner edge and drag that up. We want the goal post and goal line in the image because we want to show that the puck is about to go into the net.
The key to cropping here is not to cut out to much of the net. Hockey is a fast moving sport so we want to leave room in the image in the direction the action is headed. Your mind knows that the puck is moving forward. Leaving room gives the puck distance to travel and makes the image more pleasing to the eye. The same holds true for players. Always give players in motion distance to travel. This makes it appear almost as if they are moving through the image.

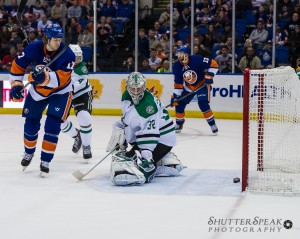
So here is the finished image ready for conversion to jpeg and export. We got rid of that pesky ref, brightened things up a bit, reduced the noise and are left with a pretty good picture. I hope some of these tips help you with your hockey photography skills. If you have a tip or a question please feel free to leave a comment below.
Be sure to check out my other hockey articles Everything You Need To Know About Photographing Ice Hockey and Photographing Hockey From Above The Net.
Support the Blogger
If you feel this article is helpful please support the blogger by using the links to products in this article or the link below:
Thank you.
- Nikon Z Shooters 28-400 or Tamron 50-400 Don’t Buy Before Watching - December 19, 2025
- World Photography Day - August 14, 2025
- Nikon Z Focus Messing Up? Try This Simple Fix! - July 22, 2025

Thanks for the Lightroom post-processing overview & tips much appreciated
I’m with Peter on the thanks. I just had my first outing at a game and thought I went overboard with 970 shots so relaxed a little with your comment!
as an amateur, this is the sort of help I have been looking for. Thanks a million
Thanks for good advise and inputs! I have shots thousands of hockey photos, but there is a lot to learn out there! I will definately use more clarity and vibrance after reading your post! Feel free to have a look at my Flickr-account, and maybe give some hints (https://www.flickr.com/photos/63409067@N07/sets/).
Is there such of a thing of Hockey Presets? Thanks,
Steve Barr
Not that I have ever seen. Hockey photos are for editorial purposes (usually) so only minor color correction and cropping is allowed for press use.